5.32.4.2. Configuration 


- Connect the Router (connector: COM) with the COM1 Port on the PC
- Establish a connection to the ISDN (connector: ISDN BRI) and if neccessary connect DSL connection (connector: ADSL over ISDN).
- Call up the Router Configuration tool program SPoAConfig.exe
- Enter configuration parameters
- Configuration parameters for the SPoA connection including the first device for scenario Section 52.3.2.1, "SPoA Router in the Customer LAN":
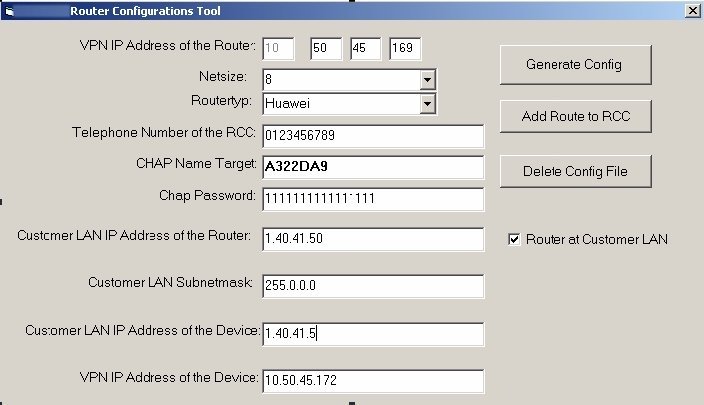 Configuration parameters for the SPoA connectionEntry FieldExplanationVPN IP Address of the RouterVPN Address of the Router.In coordination with the RCC.NetsizeReachable endpoints with IP addresses in the network.The entry here is 8. Higher values (16, 32 etc) neccessary if the number of netpoints are accordingly high (therefor always add 4 endpoints). Additionaly take four more netpoints into account for reserve. Is the number for the reserve not available the next netsize has to be used. Because the endpoints can be reached via HiSPA, use this setting only for access via the router.In coordination with the RCC.RoutertypChose between HUAWEI and Cisco RouterTelephone Number of the RCCThe RCC call back number.In coordination with the RCC.CHAP Name TargetThis parameter is entered automatically and is later used by SIRA (provided by the RCC).In coordination with the RCC.Chap PasswordHere 16 times "1" is entered (1111111111111111) by default.Customer LAN IP Address of the RouterIP address of the Router in the customer network.In coordination with the RCC.Customer LAN SubnetmaskSubnet MaskIn coordination with the RCC.Customer LAN IP Address of the DeviceIP address e.g. of the first device (e.g. SESAP sever, OpenScape 4000) for connectivity test through the RCC.VPN IP Address of the DeviceVPN address e.g. of the first device (e.g. SESAP sever, OpenScape 4000).Configuration parameter for the SPoA connection including the first device for scenario Section 52.3.2.2, "Direct Access SPoA Router with netpoints":
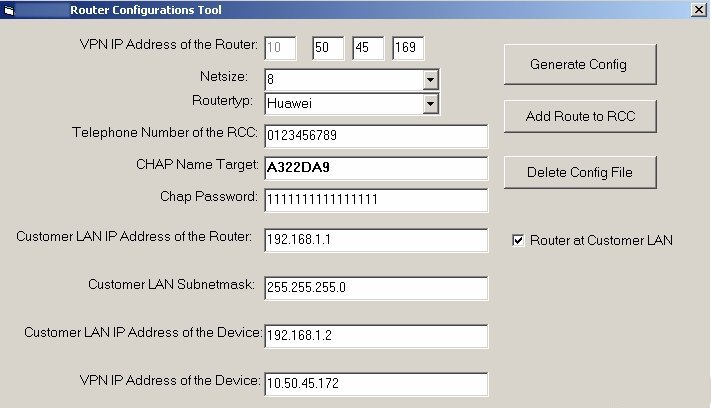 Entry FieldExplanationVPN IP address of the RouterVPN Address of the Router.In coordination with the RCC.NetsizeReachable endpoints with IP addresses in the network. The entry here is 8. Higher values (16,32 etc) are neccessary if the number of netpoints are accordingly high (therefor always add 4 netpoints). Additionaly take four more netnodes into account for reserve. Is the number for the reserve not available the next netsize has to be used. Because the endpoints can be reached via HiSPA, use this setting only for access via the router.In coordination with the RCC.RouterypChose between HUAWEI and Cisco RouterTelephone Number of the RCCThe RCC call back number.In coordination with the RCC.CHAP Name TargetThis parameter is entered automatically and is later used by SIRA (provided by the RCC).In coordination with the RCC.Chap PasswordHere 16 times 1 is entered (1111111111111111) by default.Customer LAN IP address of the RouterIP address of the router, if possible 192.168.1.1, otherwise in coordination with the customer.Customer LAN Subnet maskSubnet Mask 255.255.255.0, otherwise in coordination with the customer.Customer LAN IP address of the DeviceIP address of the first device, if possible 192.168.1.2, otherwise in coordination with the customer.VPN IP address of the deviceVPN address e.g. of the first device (e.g. SESAP sever, OpenScape 4000)
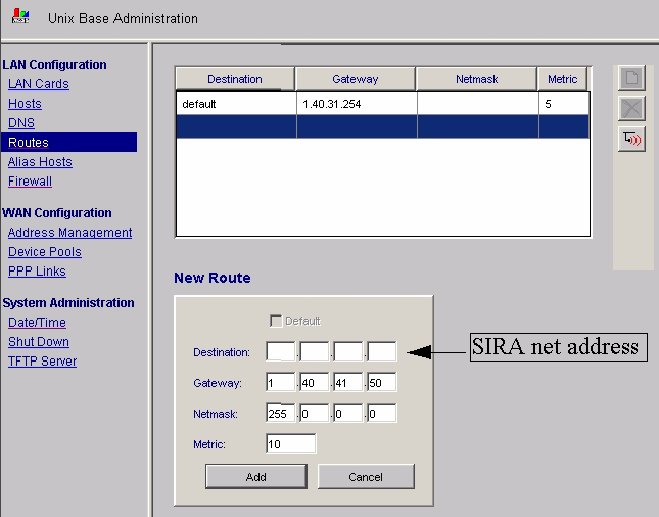
 - Gateway for the way back of the netpoints in the OpenScape 4000 Assistant
respectively of the particular application.
Example OpenScape 4000 for the scenario Section 52.3.2.1, "SPoA Router in the Customer LAN":
 Example OpenScape 4000 for the scenario Section 52.3.2.2, "Direct Access SPoA Router with netpoints":
- Switch on the router
- Start the Router configuration with the button Generate Config:
It opens the window "Tera Term Com1 VT"
IMPORTANT:
Do not switch off the router as the configuration is not yet saved. This can be done after a connection test from the RCC.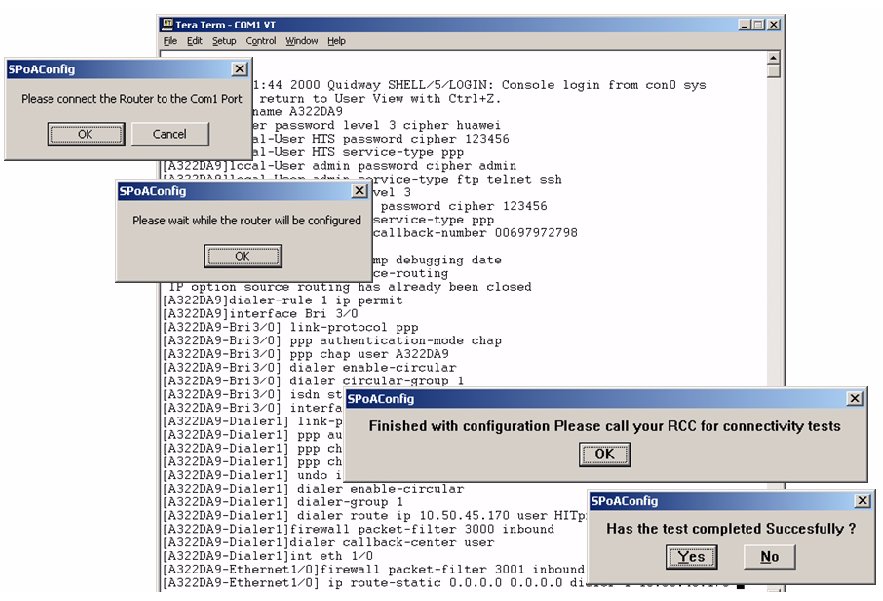 Huawei router configuration process
 - All further settings of the SPoA router will be done in the RCC.