10.2.5.1. Special Routes Between Access Points 


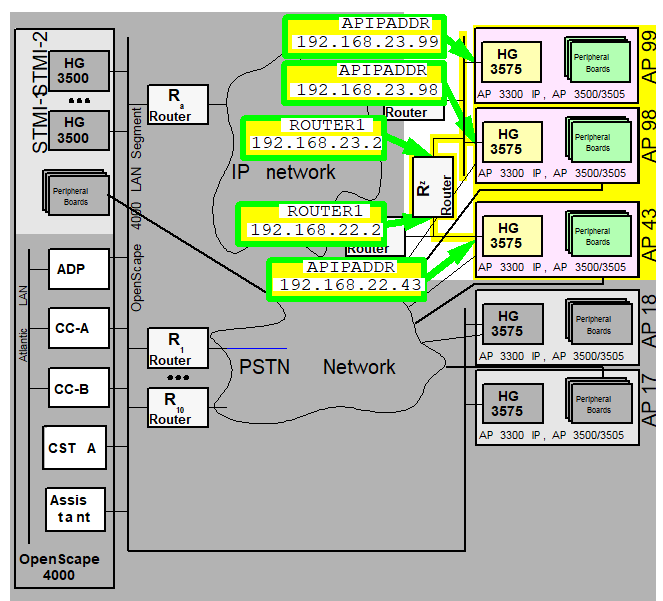
Figure 186. Special routes between access points
Generation
The configuration of special routes in HG 3575 (NCUI2/4S) is realized
with the AMO APRT in the ROUTTBL branch.
Configuring the scenario illustrated in Figure 21 “Special routes between access points”:
|
|
Configuration Management > System Data
> IPDA > HG3575 Additional Routing
Click New
if there are no existing entries. Enter LTU.
Enter the IP
addresses of the destinations and routers, enter the network masks in
the routing table and Save.
|
|
|
CHANGE-APRT:TYPE=ROUTTBL,MTYPE=NCUI,LTU=99,
                                    DSTADDR1=192.168.22.43,DSTMSK1=255.255.255.0, ROUTER1=192.168.23.2;
Sets
the route from AP99 to AP43 via Router Rz.
CHANGE-APRT:TYPE=ROUTTBL,MTYPE=NCUI,LTU=98,
                                    DSTADDR1=192.168.22.43,DSTMSK1=255.255.255.0, ROUTER1=192.168.23.2;
Sets
the route from AP98 to AP43 via Router Rz.
CHANGE-APRT:TYPE=ROUTTBL,MTYPE=NCUI,LTU=43,
                                    DSTADDR1=192.168.23.99,DSTMSK1=255.255.255.0, ROUTER1=192.168.22.2;
Sets
the route from AP43 to AP99 - and AP98 - via Router Rz.
|
In this example, the first of the 8 routing table entries was used
in all 3 modules. Of course, this presupposes that these entries have
not yet been used.
If the first 2 entries had already been used in AP43, the following
would need to be done:
|
|
Configuration Management > System Data
> IPDA > HG3575 Additional Routing
Click Search
and select LTU.
Enter the IP addresses in line 3 of the
routing table and Save.
|
|
|
CHANGE-APRT:TYPE=ROUTTBL,MTYPE=NCUI,LTU=43,
DSTADDR3=192.168.23.99,DSTMSK3=255.255.255.0,
ROUTER3=192.168.22.2; |
Table
16 “AMO APRT parameters in CHANGE branch under TYPE=ROUTTBL”
provides a precise description of the parameters.
If a ROUTTBL entry is to be deleted (e.g. the second entry
in AP43), this is realized as follows:
|
|
Configuration Management > System Data
> IPDA > HG3575 Additional Routing
Click Search
and select LTU.
Delete the IP addresses in the second line
of the routing table and Save.
Configuration Management
> System Data > IPDA > IPDA System Data
Click Search
and select the access point. Click Execute on the Action
pull-down menu and select the mode of action Update AP, confirm
with OK.
|
|
|
DELETE-APRT:TYPE=ROUTTBL,MTYPE=NCUI,LTU=43,INDEX=2;In
order for these changes to become effective in the access point, this
has to be restarted with
EXEC-USSU:MODE=UPDATAP,LTU=xx;
|
IMPORTANT:
Connections are cleared down without further
warning. Prior to the
EXEC-USSU:UPDATAP, the configuration
must be updated on the system hard disk.