3.10.3.2.4. Information on Configuration 


The examples/information below refer to the DLS configuration from
the DMZ scenario example (Figure 133)
in Section 14.2.4,
“DMZ”.
- The two network cards have to be configured first under Windows.
C:\Documents and Settings\dls-dmz>ipconfig
Windows IP Configuration
Ethernet adapter DMZ WAN:
Connection-specific DNS Suffix . :
IP Address. . . . . . . . . . . . : 220.20.20.100
Subnet Mask . . . . . . . . . . . : 255.255.255.248
Default Gateway . . . . . . . . . : 220.20.20.97
Ethernet adapter DMZ LAN:
Connection-specific DNS Suffix . :
IP Address. . . . . . . . . . . . : 10.10.99.150
Subnet Mask . . . . . . . . . . . : 255.255.255.0
Default Gateway . . . . . . . . . :
- The default gateway was configured for the DMZ-WAN interface. A permanent static route therefore has to be configured for the DMZ-LAN in order to access the corporate/enterprise network.
C:\Documents and Settings\dls-dmz>route ADD -p 10.10.0.0 MASK 255.255.0.0
10.10.99.254
C:\Documents and Settings\dls-dmz>route print
=============================================================
Interface List
0x1 ........................... MS TCP Loopback interface
0x2 ...00 1b 21 15 3d 7b ...... Intel(R) PRO/1000 MT Server Adapter - Packet
Scheduler Miniport
0x3 ...00 19 99 19 95 09 ...... Broadcom NetXtreme Gigabit Ethernet - Packet
Scheduler Miniport
=============================================================
=============================================================
Active Routes:
Network Destination        Netmask          Gateway       Interface  Metric
          0.0.0.0          0.0.0.0     220.20.20.97   220.20.20.100       20
        127.0.0.0        255.0.0.0        127.0.0.1       127.0.0.1       1
        10.10.0.0      255.255.0.0     10.10.99.254    10.10.99.150       1
       10.10.99.0    255.255.255.0     10.10.99.150    10.10.99.150       20
    10.10.99.150  255.255.255.255        127.0.0.1       127.0.0.1       20
    10.10.255.255  255.255.255.255     10.10.99.150    10.10.99.150       20
     220.20.20.96  255.255.255.248    220.20.20.100   220.20.20.100       20
   220.20.20.100  255.255.255.255        127.0.0.1       127.0.0.1       20
   220.20.20.255  255.255.255.255    220.20.20.100   220.20.20.100       20
        224.0.0.0        240.0.0.0     10.10.99.150    10.10.99.150       20
        224.0.0.0        240.0.0.0    220.20.20.100   220.20.20.100       20
  255.255.255.255  255.255.255.255     10.10.99.150    10.10.99.150       1
  255.255.255.255  255.255.255.255    220.20.20.100   220.20.20.100       1
Default Gateway:    220.20.20.97
=============================================================
Persistent Routes:
  Network Address          Netmask  Gateway Address  Metric
        10.10.0.0      255.255.0.0     10.10.99.254       1
- Install the DLS on the Windows machine with DCMP (in this example, the DCMP is installed on the same machine). If the DLS has already been installed without the DCMP, it can be installed later. Detailed service documentation can be found in the administrator documentation for OpenScape Deployment Service V8 > Installation and Initial Configuration > Set Up DCMP.
- To configure the DCMP, navigate to http://<ip address>:18080/dcmp using a web browser. The user name is "admin." If the DCMP was installed together with the DLS, the password is the same as the admin password for the DLS.
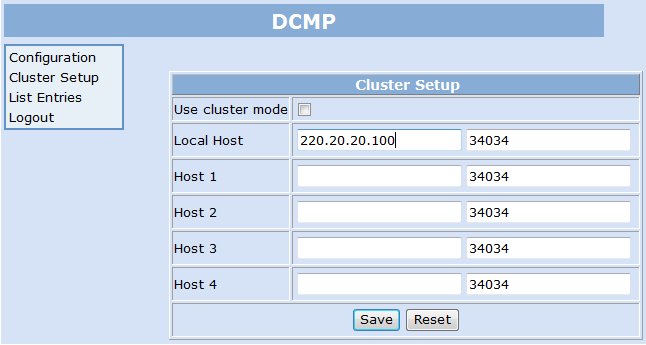
- Please check and configure the Local Host field under Cluster Setup. This contains the IP address of the DCMP server. This example simply considers a standalone DLS without DLS cluster. Refer to the administrator documentation for OpenScape Deployment Service V8 for additional information.
Figure 134. DCMP configuration for Secure Remote Subscriber
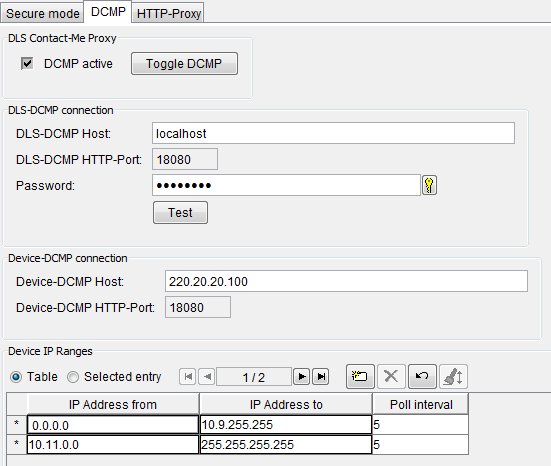
- The next step involves configuring the DLS for the DCMP.
Click the Toggle DCMP button under Administration > Workpoint
Interface Configuration > DCMP tab in order to activate
the DCMP.
If the DCMP is running on the DLS computer, the IP address of the
DCMP server will be displayed in the DLS-DCMP Host field (or localhost),
otherwise it must be entered here.
To test the communication between the DLS and DCMP, click the Test
button.
The IP address to be contacted by the IP terminals must be entered
in the Device-DCMP Host field (thus the IP address which is to
be accessible from externally).
Define one or more Device IP Ranges. Each IP terminal within
the IP range defined by IP Address from and IP Address to
is updated via the DCMP. The DSL therefore always sends a message to
the DCMP with a request to set the Contact-Me entry for this phone whenever
a change is made to a phone within one of the listed IP ranges. In our
example, the problem is that it is not always clear from which Internet
Service Provider the respective IP terminal receives its IP address range.
We have therefore entered the entire IP address range, with the exception
of the corporate/enterprise network. If accurate IP address ranges must
be known, only those needed can of course be entered. For example, IP
terminals only register from a single ISP for which the IP address range
is known.
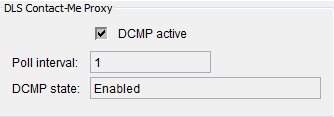
A Poll Interval must also be assigned to the respective IP
address range. This is the time in minutes after which the IP terminal
polls the DCMP. A very short polling interval (e.g. 1 minute) can be
selected for test purposes. Longer intervals are recommended in live
mode.
Figure 135. Configuring the DLS for the DCMP
- The DLS/DCMP configuration can now be tested with an IP terminal in the remote office.
-
After entering the DLS/DCMP IP address (in the example 220.20.20.100) at a terminal in the remote office, the IP terminal registers with the DLS. Because the IP of the IP terminal is from an IP address range (public Internet IP address of the remote office NAT router) that was previously entered under the DCMP configuration, the IP terminal is informed that this is a DCMP terminal.Go to the IP Devices > IP Device Management > IP Device Configuration > DCMP tab. The checkbox DCMP active should be activated.
 Testing the DLS/DCMP configuration with an IP terminal in the remote officeTo test the function, go to IP Devices > IP Phone Configuration > Gateway / Server of the previously newly registered IP terminal and start reading the configuration. A job is thus generated. To see the job, go to Job Coordination > Job Control.Click the List Entries menu on the DCMP user interface. You should see the Contact-Me job in the list. The Device ID should be the MAC address of the phone.
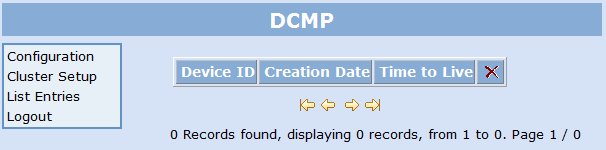
Figure 136. DCMP - List Entries menu before the IP terminal has fetched the Contact-Me job from the DCMP
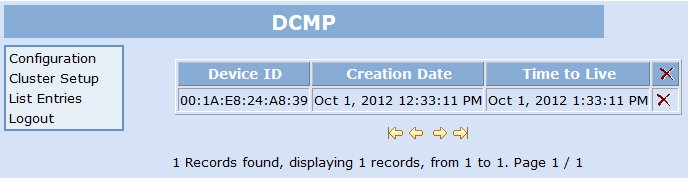 The job should then be concluded once the IP terminal has fetched the job from the DCMP. The job likewise disappears from the DCMP List Entries menu when it has been fetched.
Figure 137. DCMP - List Entries menu after the IP terminal has fetched the Contact-Me job from the DCMP
INFO:
If the job is not executed/fetched, a Wireshark trace on the DLS and/or DCMP side may assist in diagnosing the fault. With the Wireshark trace, incoming packets must be received on the default port 18080 from the IP terminal (IP address of the remote office NAT router). This is the polling of the DCMP by the IP terminal. Communication from the IP terminal to the DLS must then take place on the default port 18443 for executing the job. - Another DLS setting that makes sense in our example is the default job execution type under Job Coordination > Job Configuration. The Immediately (Execute immediately) option is set here by default. In the case of Secure Remote Subscribers it might well be that users disable their IP terminals in the remote office or disconnect them from the mains. The jobs would therefore not be executed after a certain time and would expire with "Timed out". It is recommended in this case to switch to Immediately or after registration.