11.7.3. Configuration Steps in OpenScape 4000 


Step 1: Select the signaling IP address of the CC-AP
Requirement:
ADD-DIMSU:TYPE=SYSTEM,CCAP=xx; ADD-APESU:DATA=CCAP,CCAPNO=99,IPADDR=1.30.31.66;IMPORTANT:
The CC-AP number must be one of the AP (LTU) numbers
that are configured in the system (usually the AP number, in which the
CC-AP is incorporated).
Step 2: Configure AP Emergency Group
Requirement:
EINRICHTEN-DIMSU:TYP=SYSTEM,APEGRP=xx;
ADD-APESU:DATA=APEGRP,EGRPNO=1,CCAPNO=99,THRSHLD=0,SBMODE=AUTO,NAME="HPA
MUC",STABLE=10,SBBEGIN=20,SBEND=6,SBOFFSET=15;|
Parameter
|
Description
|
|
CCAPNO
|
Number of the CC-AP that controls the emergency
group
|
|
NAME
|
Name of emergency group
|
|
SBMODE
|
Switchback mode: Manual or automatic (the switching
interval is irrelevant with a manual switchback)
|
|
SBBEGIN
|
Switching interval: Start (hour) for automatic
switchback
|
|
SBEND
|
Switching interval: End (hour) for automatic
switchback
|
|
SBOFFSET
|
Switching interval: Minutes for RSBEGIN and
RSENDE
|
|
STABLE
|
Stabilization time of LAN connection in minutes
|
|
THRSHLD
|
Threshold value for weighting algorithm
Every
AP is assigned a "weight" with AMO APESU. If the threshold value in the
emergency group is exceeded, a switchover is made to this group's CC-AP.
|
Step 3: Configure AP 98 and 99 for AP Emergency
ADD-APESU:DATA=AP,APNO=98,EGRPNO=1,WEIGHT=0,SWMODE=GROUP;ADD-APESU:DATA=AP,APNO=99,EGRPNO=1,WEIGHT=0,SWMODE=GROUP;Step 4: Configure display readout in emergency mode on system telephone
CHANGE-ZANDE:TYPE=ALLDATA,APEDTXT="AP EMERGENCY";Step 5: Define switching delay
e.g. : if a (OpenScape 4000) system RELOAD does not initiate emergency
mode, a switching delay (in minutes) can be configured.
DISPLAY-SIPCO:TYPE=TIMING;H500: AMO SIPCO GESTARTETTIMING :
-------------------------------------------------------------------
PINGTIME ( UEBERW.-ZEIT FUER PAYLOAD PATH QUALITY )
: 60 SEK RESTIME ( RESET ZEIT BEI SIGNALING VERB.
VERLUST ) : 60 SEK SUPVTIME ( UEBERW.-ZEIT FUER
SUPERVISORY VERB. ) : 4 SEK APESWDLY ( APE
UMSCHALTEVERZOEGERUNG. ) : 0 MIN ALVTIME (
UEBERW.-ZEIT FUER SIGNALING VERBINDUNG ) : 60 SEK
CHANGE-SIPCO:TYPE=TIMING,APESWDLY=<minutes>;Step 6: Display AP Emergency configuration
DISPLAY-APESU:;
+--------------------------------------------------------------------------------+
| AKTUELLE SYSTEMZEIT : 22-06-2012 09:35:47                                      |
+--------------------------------------------------------------------------------+
+--------------------------------------------------------------------------------+
| CC-AP: 99 IP ADRESSE: 1 .30 .31 .66                                            |
+--------------------------------------------------------------------------------+
+--------------------------------------------------------------------------------+
| AP EMERGENCY GRUPPE: 1 CC-AP: 99 NAME: HPA MUC                                 |
| SCHWELLE: 0 RSMODE: AUTO                                                       |
| STABIL: 10 MIN RSBEGIN: 20 H RSENDE: 6 H RSOFFSET: 15 MIN                      |
+--------------------------------------------------------------------------------+
| AP: 98 AP EMERGENCY GRUPPE: 1 CC-AP: 99 GEWICHT: 0 UMSCHALT: GRUPPE            |
| KONTROLL-EINHEIT: UNBEKANNT SIGNAL-PFAD: KEIN                                  |
| LETZTE AUFGEZEICHNETE VERBINDUNGS-STATUS-AENDERUNG:                            |
|                                                                                |
| HOST-CC: VERBUNDEN: NEIN GETRENNT SEIT: 00-00-0000 00:00                       |
| CC-AP: VERBUNDEN: NEIN GETRENNT SEIT: 00-00-0000 00:00                         |
+--------------------------------------------------------------------------------+
| AP: 99 AP EMERGENCY GRUPPE: 1 CC-AP: 99 GEWICHT: 0 UMSCHALT: GRUPPE            |
| KONTROLL-EINHEIT: UNBEKANNT SIGNAL-PFAD: KEIN                                  |
| LETZTE AUFGEZEICHNETE VERBINDUNGS-STATUS-AENDERUNG:                            |
|                                                                                |
| HOST-CC: VERBUNDEN: NEIN GETRENNT SEIT: 00-00-0000 00:00                       |
| CC-AP: VERBUNDEN: NEIN GETRENNT SEIT: 00-00-0000 00:00                         |
+--------------------------------------------------------------------------------+
Step 7: Update the BP database and synchronize local HG3575 database
EXEC-USSU:MODE=UPDATAP,LTU=98;EXEC-USSU:MODE=UPDATAP,LTU=99;EXEC-UPDAT:UNIT=BP,SUSY=ALL;Step 8: Check synchronicity of configuration management
After the setup is finished with AMO APESU, connect to the OpenScape
4000 Assistant in the host (e.g. http://1.30.11.212). Verify here first
that the configuration management is in sync with the RMX system. If
this is not the case, an upload must be performed.
To do this, go to Configuration Management > Network > System,
click Search on the displayed page and start the upload if necessary
with Action/ Upload.
Step 9: Configure the time server in the host
An exact time is required for many OpenScape 4000 functions. The OpenScape
4000 should therefore be connected to a time server. The procedure here
is as follows:
- Set up an ssl connection to the SLES (e.g. with putty), in this case to 1.30.31.210.
- Log in with root/hicom and call yast.
- Go to System / Date and Time in yast.
- Set the Region (e.g. Europe) and Time Zone (e.g. Germany). Activate Hardware Clock Set To UTC and then go to the Change Date and Time page with Change. Enter the IP address of the time server here under Synchronize with NTP Server (in this case 1.50.100.2). Tick Save NTP Configuration and go to Configure.
- Activate Advanced NTP Configuration > Now and on Boot. The NTP service restarts after pressing Ok and yast can be exited again.
- The RMS time is updated with AENDERN-DATE:;
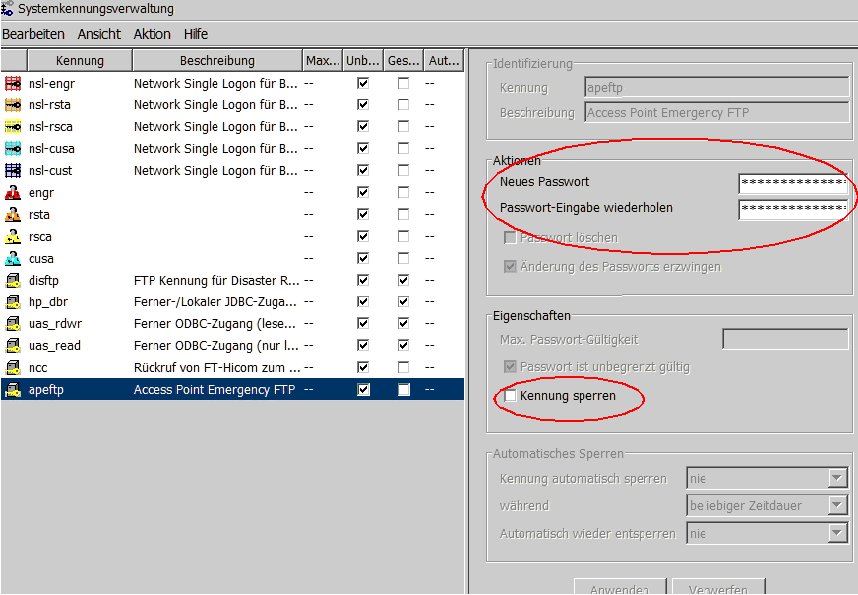
Step 10: Configure the system ID apeftp
Instead of a conventional system ID, the special system identifier
apeftp should be used for transporting the APE backup set. To use apeftp,
it has to be released explicitly. To do this, go to Access Management
> System Account Administration in OpenScape 4000 Assistant and
unlock the apeftp user and assign a password.
The same must also be done later in the OpenScape 4000 Assistant of
the APE processor because the IDs and passwords are not synchronized
via the APE backup.
Figure 216. Configuring the system ID apeftp in the host
Step 11: Configure the AP backup server
OpenScape 4000 Assistant:
Software Management > Backup & Restore > AP Backup Server
The OpenScape 4000 is itself the backup server in this example. The
directory /.AS/BACKUP/IPDA is provided in the system. Now select Test
(also includes configuration).
Figure 217. Configuring the AP backup server in the host

By setting the schedule for the backup, the transfer time to the CC-APs
is defined indirectly. After a maximum of 10 minutes (not controllable)
following the backup, the CC-APs recognize that a more recent backup
set is available and automatically fetch the delta.
The first backup has to be started manually (step 2) with the initial
installation in order to set up the feature fully.
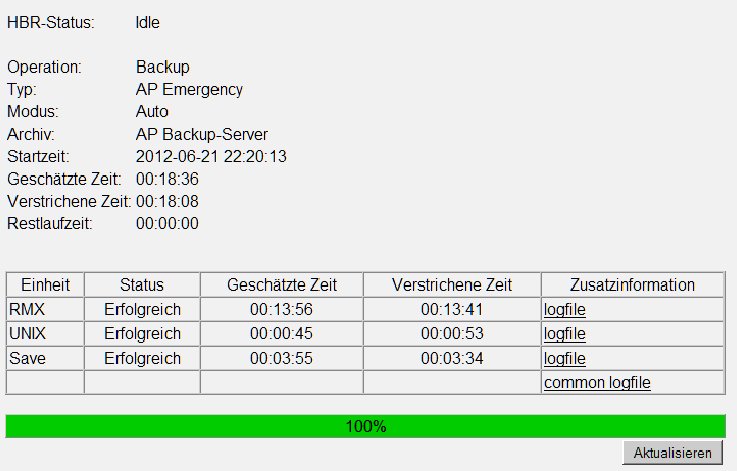
Check the status after the manual backup:
Figure 218. Checking the backup status