10.2.14.3. Changes in the OpenScape 4000 LAN Segment 


This is the most complicated change of all, and the one which harbors
the greatest risk, which is why address changes in the OpenScape 4000
LAN segment should be avoided whenever possible.
The reason is the security concept of IPDA. An access point may only
be controlled by CC-A or CC-B. To this end, the IP addresses of the two
processors are configured in the access point. If these addresses change,
the access point can no longer be controlled and would have to be reconfigured
locally.
This potentially risky task was improved in HiPath 4000 V6 R2. Since
this version there is a possibility to connect to the access point from
arbitrary IP address if there is no active HSR connection. So it is possible
to open a new connection and transfer the configuration data to the access
point or OpenScape 4000 SoftGate and establish the regular control connection.
After this step the original security mechanism , that means the remote
CC-A, CC-B address check, is activated again.
Furthermore, if the control connection to an access point can not
be open, there is a possibility to start an SSH session to its control
IP address and perform the configuration changes manually.
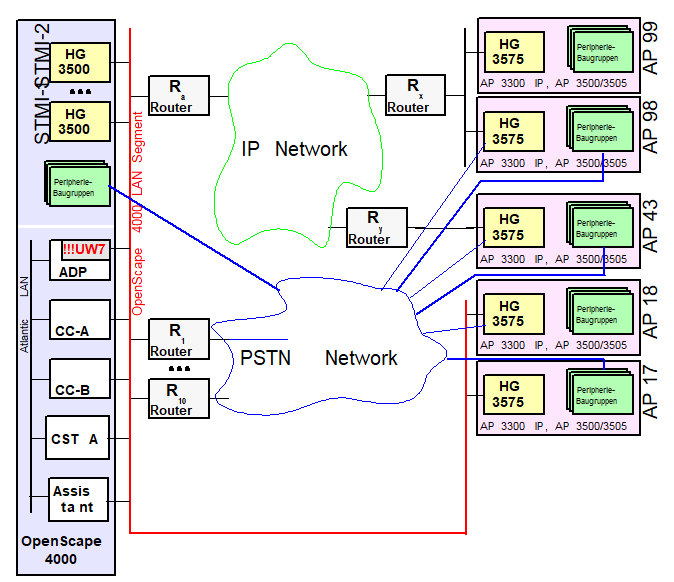
Figure 205. Installation example
We receive the following information from the customer’s network
administrator:
Table 49. Address change in OpenScape 4000 LAN segment
|
Name
|
NEW address
|
OLD address
|
|
Netmask
|
255.255.255.224
|
255.255.255.0
|
|
Network address
|
10.123.1.64
|
192.168.1.0
|
|
CC-A
|
10.123.1.65
|
192.168.1.1
|
|
CC-B
|
10.123.1.66
|
192.168.1.2
|
|
ADP
|
10.123.1.67
|
192.168.1.3
|
|
Router Ra
|
10.123.1.94
|
192.168.1.254
|
|
Router R1
|
10.123.1.83
|
192.168.1.101
|
|
Router R10
|
10.123.1.93
|
192.168.1.102
|
|
AP 17
|
10.123.1.77
|
192.168.1.17
|
|
AP 18
|
10.123.1.78
|
192.168.1.18
|
|
STMI-1
|
10.123.1.68
|
192.168.1.10
|
|
STMI-2
|
10.123.1.69
|
192.168.1.11
|
The following procedure avoids local reconfiguration of the access
points.
Step 1
Change the IP addresses in the OpenScape 4000 LAN segment.
|
|
Configuration Management > System Data
> IPDA > IPDA System Data
Click Search, change
the IP addresses and, if required, Network Mask on the System
Data tab and Save.
|
|
|
CHANGE-SIPCO:TYPE=LSNET,NETADDR=10.123.1.64,
NETMASK=255.255.255.224,DEFRT=10.123.1.94, CCAADDR=10.123.1.65,CCBADDR=10.123.1.66; |
This results in the addresses being changed. However, the change is
not effective until the system has been restarted, which must be the
last step performed in this sequence.
Step 2
The CC-A and CC-B address changes implicitly for “networked“ access
points.
LSRTADDR must be explicitly modified as well
as the address of the router on the OpenScape 4000 LAN segment (Router
Ra) used for configuring the signaling connection.|
|
Configuration Management > System Data
> IPDA > IPDA Access Point
Click Search and select
the access point.
Change the address of the router in the network
on the IP Interface (NW) tab and Save.
Configuration
Management > System Data > IPDA > IPDA System Data
Click
Search and select the access point. Click Execute on the
Action pull-down menu and select the mode of action Update
AP, confirm with OK.
|
|
|
CHANGE-UCSU:UNIT=AP,LTU=xx,LSRTADDR=10.123.1.94;EXEC-USSU:MODE=UPDATAP,LTU=xx;for
every “networked“ AP, i.e. in this example 43, 98 and 99.
|
This puts the access points out of operation until both the CC address
change in the system is effective and the routing in the customer network
has been changed. Existing links are disconnected.
Step 3
Change the OpenScape 4000 LAN addresses of the “direct link“ access
points.
It is assumed in this context that the addressing in the internal
network of the “direct link“ access points is not changed.
|
|
Configuration Management > System Data
> IPDA > IPDA Access Point
Click Search and select
the access point.
Change the address of the router in the network
on the IP Interface (DL) tab and Save.
Configuration
Management > System Data > IPDA > IPDA System Data
Click
Search and select the access point. Click Execute on the
Action pull-down menu and select the mode of action Update
AP, confirm with OK.
|
|
|
CHANGE-UCSU:UNIT=AP,LTU=17,LSRTADDR=10.123.1.77;EXEC-USSU:UPDATAP,17;CHANGE-UCSU:UNIT=AP,LTU=18,LSRTADDR=10.123.1.78;EXEC-USSU:UPDATAP,18; |
This puts the access points out of operation until the CC address
change in the system is effective. Existing links are disconnected.
Step 4
Change the survivability router addresses at the OpenScape 4000 LAN
segment.
In the example, this involves Routers R1 and R10.
In order to change their addresses in the OpenScape 4000 LAN segment,
they must be deleted from the configuration and re-entered.
Unfortunately, a survivability router cannot be deleted until no more
access points are configured on this router.
In this example, these are the access points 18, 43 and 98 which are
configured for signaling survivability. Here, too, the configuration
must be deleted and re-entered again.
The address configuration of the survivability routers (e.g. WAML)
must, of course, be modified as well.
The overall procedure is as follows:
|
|
Configuration Management > System Data
> IPDA > IPDA Access Point
Click Search and select
the access point.
Delete the router number on the General
tab under Signaling Survivability and Save.
Configuration
Management > System Data > IPDA > IPDA Signaling Survivability
Router
Click Search and select router > Delete.
Click
New, enter router with modified data and Save.
Configuration
Management > System Data > IPDA > IPDA Access Point
Click
Search and select the access point.
Enter the router number
on the General tab under Signaling Survivability and Save.
|
|
|
DELETE-APRT:TYPE=SURV,CONF=AP,LTU=43;DELETE-APRT:TYPE=SURV,CONF=AP,LTU=98;DELETE-APRT:TYPE=SURV,CONF=ROUTER,ROUTERNO=1;ADD-APRT:TYPE=SURV,CONF=ROUTER,ROUTERNO=1,
LSADDR=10.123.1.83;ADD-APRT:TYPE=SURV,CONF=AP,LTU=43,ROUTERNO=1;ADD-APRT:TYPE=SURV,CONF=AP,LTU=98,ROUTERNO=1;DELETE-APRT:TYPE=SURV,CONF=AP,LTU=18;DELETE-APRT:TYPE=SURV,CONF=ROUTER,ROUTERNO=10;ADD-APRT:TYPE=SURV,CONF=ROUTER,ROUTERNO=10,
LSADDR=10.123.1.93;ADD-APRT:TYPE=SURV,CONF=AP,LTU=18,ROUTERNO=10; |
Step 5
Change the addresses of the HG 3500 modules:
|
|
Configuration Management > System Data
> Board > Board
Click Search and select STMI.
Change the address on the STMI Board Data tab under IP
Gateway and Save.
|
|
|
CHA-BCSU:TYPE=IPGW,LTU=5,SLOT=85,IPADDR=10.123.1.68;CHA-BCSU:TYPE=IPGW,LTU=5,SLOT=91,IPADDR=10.123.1.69; |
IMPORTANT:
If special routes are used in the configuration
of the IPDA system (between access points and HG 3500), these must all
be checked and, if necessary, modified. (
CHANGE-APRT:TYPE=ROUTTBL
...)Subsequently, the changed addresses have to be loaded on the HG 3500
modules via:
|
|
Configuration Management > System Data
> Maintenance > Board Maintenance
Click Search
and select STMI.
Click Execute on the Action
pull-down menu, select Restart and confirm with OK.
|
|
|
RESTART-BSSU:ADDRTYPE=PARTNO,PARTNO=Q2316-X,FCTID=1; |
Step 6
To complete the procedure, the OpenScape 4000 switch now has to be
reset in order for the addresses configured with SIPCO to become effective.
|
|
The restart can only be initiated in expert
mode.
Expert Mode > Expert Access > Open ...<IP>
with AMO (see AMO command)
|
|
|
EXEC-REST:UNIT,BP,SOFT; |
Contact with the “networked“ access points cannot be re-established
until the routing in the customer network has also been changed.