3.6.3. Generation (Example) 


The following generation example corresponds to Scenario 2 shown in
Section 10.1.4,
“Switchover process”. Each of the OpenScape 4000 SoftGates
have NORMAL and STBYRDY boards (mixed mode).
IMPORTANT:
The pairs configured in AMO BPOOL must have the
same type in AMO UCSU, parameter SOCOTYP (e.g.: both SOCO50
or both SOCO1000).
IMPORTANT:
The pairs configured in AMO BPOOL cannot be changed.
In case of an incorrect configuration, the pair has to be deleted and
then reconfigured.
IMPORTANT:
In case vHG-SIP boards are configured in BPOOL,
the Standby SoftGate is not automatically informed that these are vHG-SIP
boards (instead it treats them as vHG-HFA). To activate them correctly,
it is necessary to restart the Standby SoftGate with e. g. RES-USSU.
/* BFDAT NORMAL boards */
ADD-BFDAT:FCTBLK=35,FUNCTION=HG3530,BRDBCHL=BCHL120,ATTR="SOCO";
CHANGE-BFDAT:CONFIG=CONT,FCTBLK=35,FUNCTION=HG3530,LINECNT=240,BCHLCNT=60;
CHANGE-BFDAT:CONFIG=OK,FCTBLK=35,ANSW=YES;
ADD-BFDAT:FCTBLK=30,FUNCTION=SIP,BRDBCHL=BCHL120,ATTR="SOCO";
CHANGE-BFDAT:CONFIG=CONT,FCTBLK=30,FUNCTION=SIP,LINECNT=120,BCHLCNT=120;
CHANGE-BFDAT:CONFIG=OK,FCTBLK=30,ANSW=YES;
/* BFDAT STBYRDY boards */
ADD-BFDAT:FCTBLK=45,FUNCTION=STANDBY,BRDBCHL=BCHL120,ATTR="SOCO";
/* OpenScape 4000 SoftGate 18 boards */
ADD-BCSU:MTYPE=IPGW,LTG=1,LTU=18,SLOT=3,PARTNO="Q2330-X ",FCTID=1,LWVAR="0",FCT BLK=35,BCHL3530=30,ALARMNO=0,IPMODE=IPV4,DHCPV4=NO,DHCPV6=NO; ADD-BCSU:MTYPE=IPGW,LTG=1,LTU=18,SLOT=11,PARTNO="Q2330-X ",FCTID=1,LW VAR="0",FCTBLK=45,BCHLSIP=120,ALARMNO=0,IPMODE=IPV4,DHCPV4=NO,DHCPV6=NO; ADD-BCSU:MTYPE=IPGW,LTG=1,LTU=18,SLOT=8,PARTNO="Q2330-X ",FCTID=1,LWVAR="0",FCT BLK=45,BCHL3530=30,ALARMNO=0,IPMODE=IPV4,DHCPV4=NO,DHCPV6=NO;
/* OpenScape 4000 SoftGate 18 gateways */
ADD-CGWB:LTU=18,SLOT=3,SMODE=NORMAL,IPADR=10.3.83.133,NET MASK=255.255.255.0,VLAN=NO,VLANID=0,DEFRT=10.3.83.1; ADD-CGWB:LTU=18,SLOT=11,SMODE=STBYRDY,IPADR=10.3.83.140,NET MASK=255.255.255.0,VLAN=NO,VLANID=0,DEFRT=10.3.83.1; ADD-CGWB:LTU=18,SLOT=8,SMODE=STBYRDY,IPADR=10.3.83.138,NET MASK=255.255.255.0,VLAN=NO,VLANID=0,DEFRT=10.3.83.1;
/* OpenScape 4000 SoftGate 20 boards */
ADD-BCSU:MTYPE=IPGW,LTG=1,LTU=20,SLOT=3,PARTNO="Q2330-X ",FCTID=1,LWVAR="0",FCT BLK=45,BCHL3530=30,ALARMNO=0,IPMODE=IPV4,DHCPV4=NO,DHCPV6=NO; ADD-BCSU:MTYPE=IPGW,LTG=1,LTU=20,SLOT=11,PARTNO="Q2330-X ",FCTID=1,LW VAR="0",FCTBLK=30,BCHLSIP=120,ALARMNO=0,IPMODE=IPV4,DHCPV4=NO,DHCPV6=NO; ADD-BCSU:MTYPE=IPGW,LTG=1,LTU=20,SLOT=8,PARTNO="Q2330-X ",FCTID=1,LWVAR="0",FCT BLK=35,BCHL3530=30,ALARMNO=0,IPMODE=IPV4,DHCPV4=NO,DHCPV6=NO;
/* OpenScape 4000 SoftGate 20 gateways */
ADD-CGWB:LTU=20,SLOT=3,SMODE=STBYRDY,IPADR=10.3.84.33,NET MASK=255.255.255.0,VLAN=NO,VLANID=0,DEFRT=10.3.84.1; ADD-CGWB:LTU=20,SLOT=11,SMODE=NORMAL,IPADR=10.3.84.40,NET MASK=255.255.255.0,VLAN=NO,VLANID=0,DEFRT=10.3.84.1; ADD-CGWB:LTU=20,SLOT=8,SMODE=NORMAL,IPADR=10.3.84.38,NET MASK=255.255.255.0,VLAN=NO,VLANID=0,DEFRT=10.3.84.1;
/* BPOOL OpenScape 4000 SoftGate 18/20 */
ADD-BPOOL:MTYPE=AP,POOLNO=1,LTUA=18,SLOTA=3,LTUB=20,SLOTB=3,INFO="SG 18-20
POOL";
ADD-BPOOL:MTYPE=AP,POOLNO=1,LTUA=20,SLOTA=11,LTUB=18,SLOTB=11;
ADD-BPOOL:MTYPE=AP,POOLNO=1,LTUA=20,SLOTA=8,LTUB=18,SLOTB=8;
In case SIP boards are configured in BPOOL, to inform
the Softgate about the new SIP function boards, it is necessary to restart
the standby Softgate.
Manual switchover
Switching over from OpenScape 4000 SoftGate 18 to OpenScape 4000 SoftGate
20 (or in the other direction) can be performed manually with following
command:
EXEC-USSU:ART=SGRED,LTU=18,SWTYPE=<param>;
SWTYPE=ALL will switch all vHG HFA (3530) &
vHG SIP subscriber boards configured in that SoftGate BPOOL.
SWTYPE=HOME will only switch the vHG HFA (3530) & vHG SIP
subscriber boards which are not in normal status of that specified OpenScape
4000 SoftGate. It can be seen as "Switch them back to Home/Initial state"
after they had been switched before, either automatic or manually.
Terminal configuration (HFA):
Both IP addresses (home gateway and standby gateway) must be known
to the terminal.
Settings made using DLS:
- Active gateway
-
Main Menu > IP Devices > IP Phone Configuration > Gateway/Server > Tab Gateway (HFA) / SIP Server > Reg-Address (HFA) / SIP Server Address
- Standby gateway
-
Main Menu > IP Devices > IP Phone Configuration > Gateway/Server > Tab Gateway (Standby) > Reg-Address
- Configuration of subscriber redundancy at the terminal:
-
Main Menu > IP Devices > IP Phone Configuration > Small Remote Site Redundancy > Tab SRSR Settings > Checkbox SRSR freigeschaltet (SRSR Released???)Settings via WBM:
- OpenStage
-
Administrator > System > Gateway
 OpenStage - Subscriber Redundancy - GatewayAdministrator > System > Standby Gateway
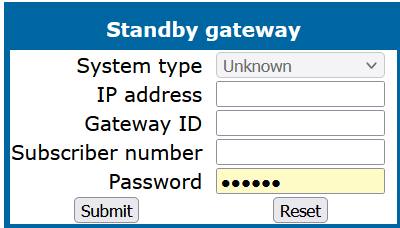 OpenStage - Subscriber Redundancy - Standby GatewayAdministrator > System > Redundancy
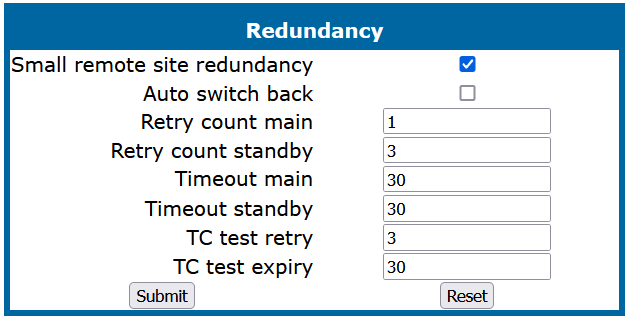 OpenStage - Activate Subscriber Redundancy
 - optiPoint
-
Administrator > System > Gateway Settings
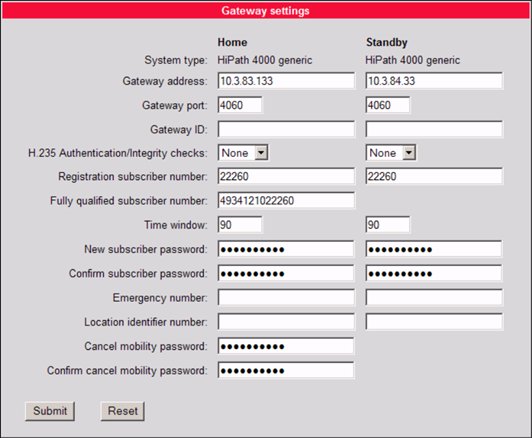 optiPoint - Subscriber Redundancy - GatewaysAdministrator > System > SRSR Settings
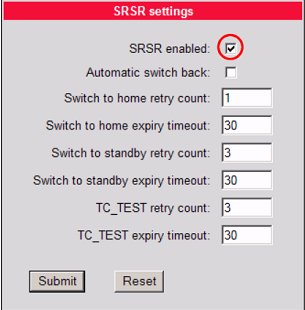 optiPoint - Activate Subscriber Redundancy
Terminal configuration (SIP CP Phones - please see official documentation "OpenScape Desk Phone CP Phone Administration" chapter 3.6.10 Resilience and Survivability):
Failover on must be set to Timeout and Error
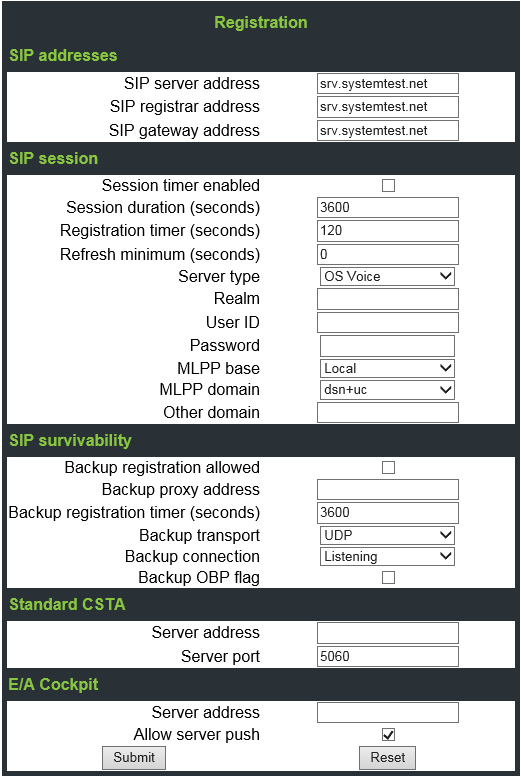
Figure 103. For CP Phones only DNS SRV method can be used for enhanced survivability.
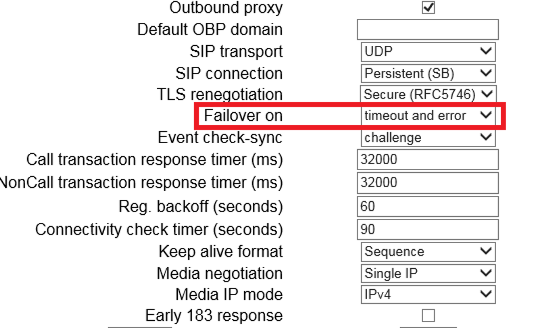
Figure 104. Configuration of Mediatrix C7 Series / AP1120
The Mediatrix C7 Series / AP1120 must be configured to try an alternative
destination if call is rejected.
Cause value “21” must be added to the Hunting group causes. Please
see Mediatrix C7 Series / AP1120 service documentation for details. E.g.
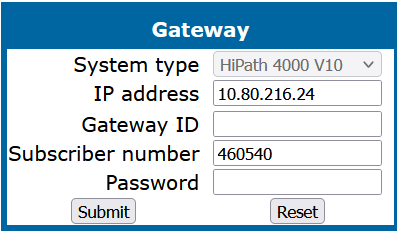
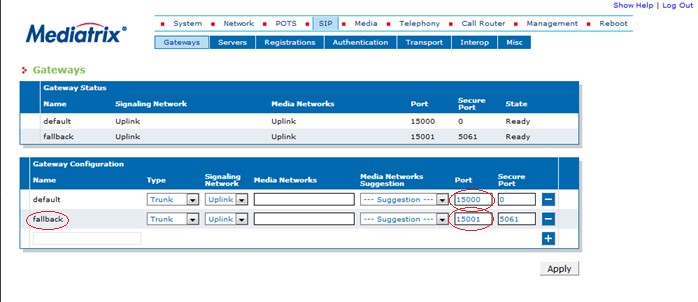
Notes to configuration according to recommended Media5 Corporation documentation:
Configuration of default (Normal)
and fallback (Redundancy) Gateways:
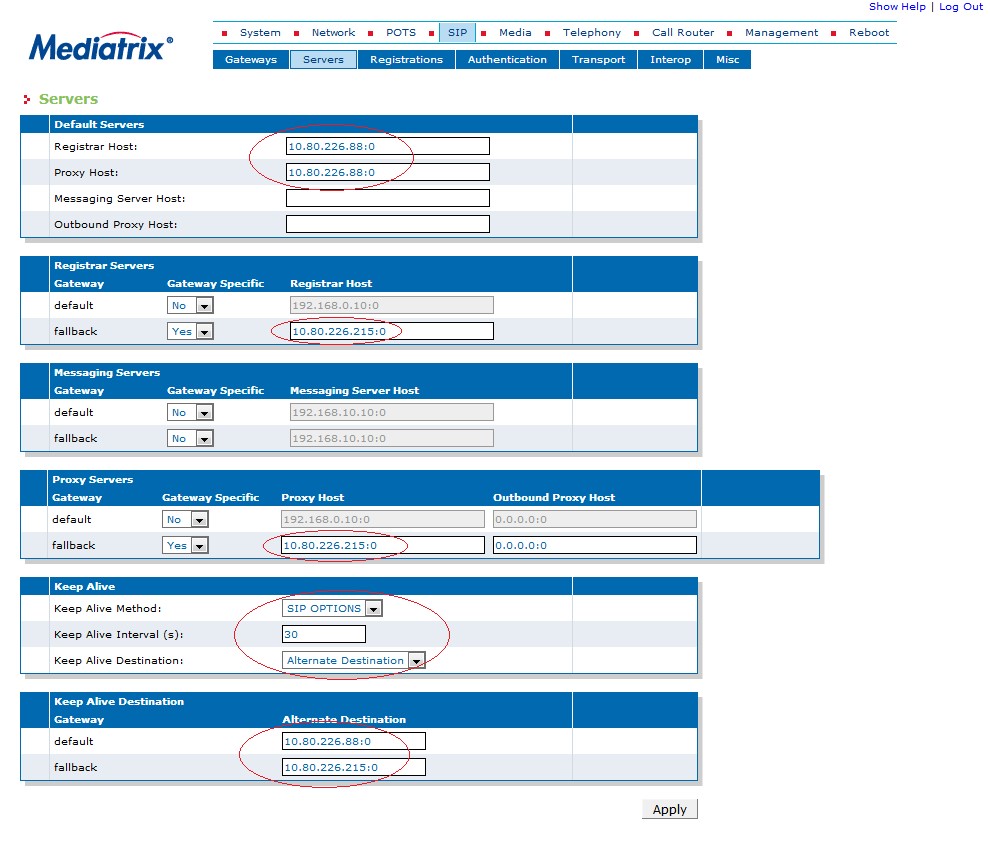
Configuration of Default
(Normal) and Fallback servers
(Registrar server and Proxy
server) :
Status of SIP
registration and Configuration
of endpoints :

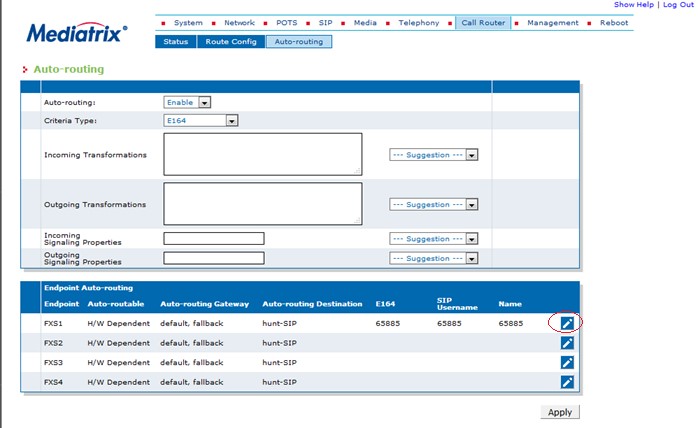
Configuration of Call
Router for registration and
to establish a call :
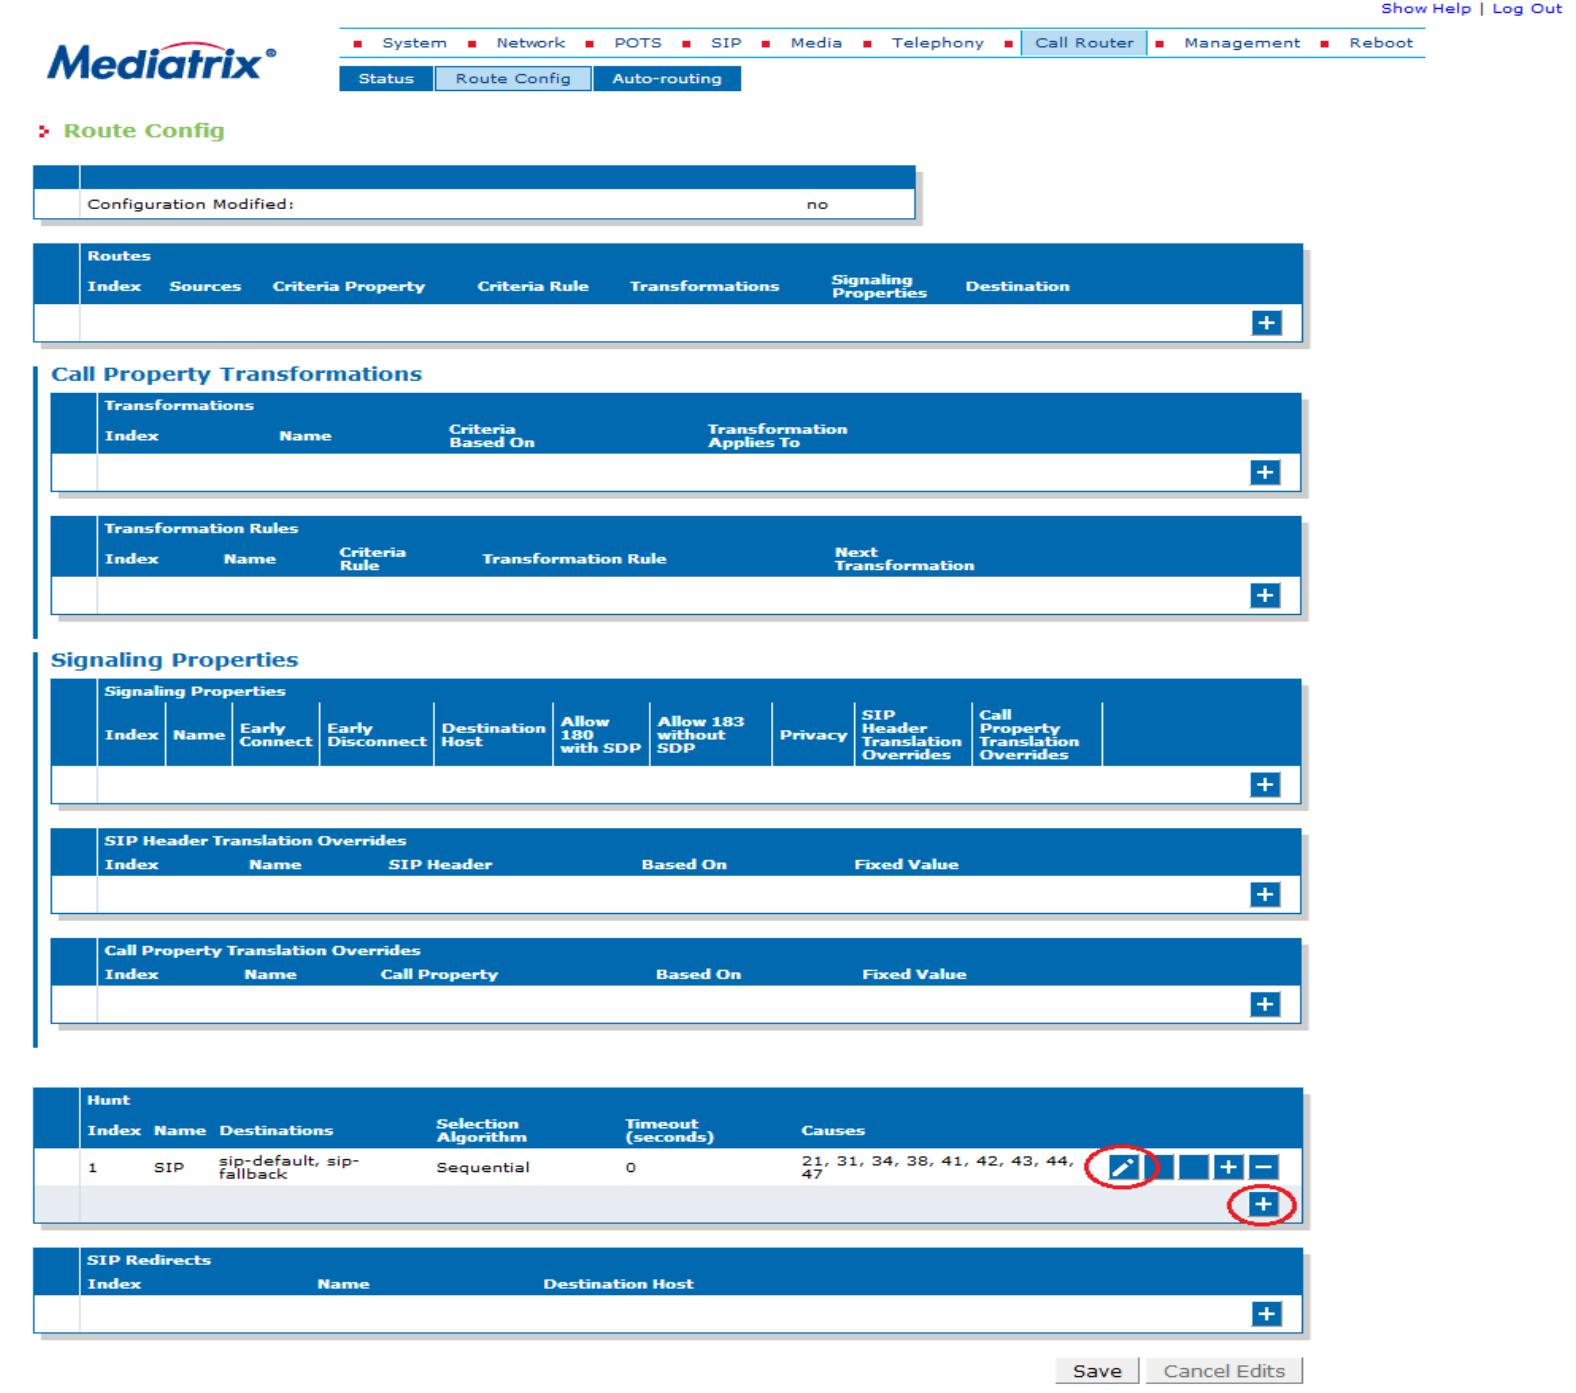
We can create Hunt Group definition by pressing the
button [+] - see documentation of Media5 Corporation at the reference
above. We can also edit Hunt Group by pressing button [pen].
Modify Auto-routing definition
to Endpoint :